Showing posts with label Custom Stationery. Show all posts

10.28.2011

Sneak Peek: Pink and Blue Airplane Party


My daughter is OBSESSED with airplanes. So much so that we are going to do our best to give her an airplane party for her upcoming second birthday. In order to make it a little more girly, I've added some fluffy clouds and pink into the mix. Stay tuned for more as we plan and create for this upcoming event.

Need kids party invitations? We can work with you to design invitations that encompass all your want your party to be!

10.10.2011

Type. Set. Press.


On Saturday I was fortunate to drive to Houston for a Letterpress class at the Museum of Printing History. My friend Tania joined me both for the drive and the class. We had a blast. It was so fun! Not only did I get to spend that time with Tania, and meet the fellow Letterpress enthusiasts, but we actually went through the motions of designing, typesetting, proofing and printing.


(photos above borrowed from & property of weekendprojectgirl)

Tania and I left bright and early at 6:30am to make the 3 hour drive into Houston. We arrived about 2 and half hours later after a coffee stop and some pretty interesting sleepy-eyed conversation. Its always hard to form words, let alone complete sentences, when its still dark outside and my IV coffee drip hasn't been started. We arrived to an open but empty museum, it was a little erie. As other students and the instructor arrived Tania and I felt more at ease, knowing our 3 hour trip was not in vain. I have to admit that for a few minutes I wondered if the class was really going to happen.


(photos above borrowed from & property of weekendprojectgirl) 

Amanda, our wonderful instructor (also the curator of the museum), introduced the class with a selection of business cards that previous students of the class had created and that she had collected through the years. We each introduced ourselves and our purpose. There was an interior designer (thanks to Kelly for her pictures from weekendprojectgirl.blogspot.com), a marketing/advertising guy turned graphic designer -- due to accidentally falling more in love with typography in the ads than the ads themselves, and a married couple -- one a photographer the other an intern-architect who had fallen in love with letterpress during wedding planning (as many people do), Tania -- an intern-architect, and myself -- designer and artist.  The size of the class was a big plus, with only 6 students there was plenty of room in the workshop to move around and each have a chance to participate.

Amanda gave us a typesetting demo, using physical lead type and a composing stick. She taught us the lingo, most of which I have a cheat sheet for because I have forgotten. When she was done with her demo she let us loose to create our own "business card" design. The collection of type was incredible and I quickly just picked the first drawer I opened for my design. I didn't want to get caught up in choosing a font when I just wanted to practice the art form of typesetting. I created a card for my 22 month old daughter who loves to dance, hence the "dancer extraordinaire."

Because none of us had ever done this before it took us a little over an hour to actually compose the type for a standard business card size. Its a beautiful but labor intensive process. When we had all completed our composition, we lined them up together and locked them on the platen of the table-top press that we would use to proof. My Showcard press that I have at home is similar to this, but a smaller table-top size. We each had the opportunity to run the press once for a proof set. A few of us made some minor changes after proofing.

Amanda helped us to split them into two groups of three and lock them up together to move the set to the platen of our Kelsey table-top, and the other group's floor model Kelsey. We had the opportunity to "ink-up" the plates and rollers, set the paper guides and run a series of prints. Amanda showed us how to adjust the "packing" and adjust the pressure to achieve the perfect print every time. Of course every press is and will be different. Our group; Tania, Kelly and I, figured out how to do a double run on each sheet for the intensity of color. You should have seen our excitement after the first pull. WOW, it was incredible!

We ran out of time to cut apart the cards, so Amanda will be sending each of us our cards -- I will post pictures of those when I receive them.

Its been a dream of mine to learn this incredibly hands on art form and in turn be able to offer it to my clients. We are half way there! There is still so much to learn, but I really feel like I'm on my way to falling in love with the process. I returned from Houston gushing to my family and friends about the experience.


image: weekendprojectgirl

If you are in the Houston Area, please check out and support the museum and here is the class description if you are interested in the future:


Letterpress Business Cards

Learn the basics of setting type by hand and letterpress printing using the table-top platen press, still widely available on the market. Learn the california job case, set type, use a pica ruler and composing stick, mix ink, ink the press and print. Each student will set and print his or her own business card. We'll pull proofs, make corrections and print multiple copies; then we'll distribute type and spacing, and clean up.

Instructor: Amanda Stevenson
Level: all levels
Tuition: $90 plus $15 materials fee

9.27.2011

Essence of the Holidays

The Holidays are approaching quickly, contact us today for your custom holiday cards, party invitations, baby announcements, or thank you notes!


Bloom recently collaborated with Essence Photography from Redding, California on a new endeavor. We created a custom template set for holiday cards. These templates will be used by Essence Photography to offer beautiful custom photo holiday cards to her clients. Each template can be color, texture and photo customized. If you don't live in Northern California and Essence Photography isn't available to you, we hope to adjust these designs for sale on Etsy soon! Let your family photographer know that you're interested in these designs and have them contact us. Each card is designed according to Miller's Lab Professional Imaging specs. Millers Lab is only available to professional Photography businesses, but each template can be adjusted for your personal card orders as well.

Want one of these designs adjusted for you this holiday season? Just Ask! We will do what we can to help you out!

9.12.2011

Black, white and red all over, programs revisited.

LemonLime photography posted their photos of this wedding on their blog the other day, including a beautiful picture of the programs that Bloom produced. Visit their blog to see the rest.

9.02.2011

Wrap it up!

I've always had a love for wrapping presents. When the holidays roll around, I can't wait to find wrapping paper and make them all coordinate! Making it look cute and matching various wrapping accessories is all consuming for me. We have a friend who's birthday just passed and the party is this weekend. She too I know has a love for making gifts aesthetically pretty and will appreciate this as much as I do! Custom tags available for the holidays, contact Bloom to discuss your holiday gift wrapping ideas.


As a side note, I've never been able to wear green, so why lately am I so obsessed with it?

8.16.2011

The Holidays Approach


With the beginning of the school year and the vast Christmas displays already in place at Hobby Lobby, I am reminded that the holidays are around the corner. Bloom is now accepting your orders for holiday cards and invitations. We are also still accepting orders for fall weddings. Contact us today to get started!!

One Last Prohibition Era Piece.


As a final piece in the Prohibition Era Themed Wedding Package, we designed an announcement to be sent out after the wedding. They are a 5x7 (A7 size) printed on the same 110# stock as the other pieces in the package. Each has a grey envelope and printed address labels. The clients wanted the wording to reflect some tradition but still give an overall casual feel.


4.21.2011

Casually Pretty

As Matron of honor in my Sister-In-Law's wedding this July, it is in my job description (and I really wanted to! I didn't do it just because of the job description.) to throw a bridal shower for the bride. Being as she is in Kansas City, and I am in Austin, I needed a little more help from her than I normally would ask for this sort of thing. The original thought was a formal tea party, but the cost per person is exorbitant. Then we thought maybe a spa day shower, Mani-Pedis, with some wine and food. Well the salon wasnt large enough for our group for a lunch and Kansas has wierd liquor laws. So, in thinking of another option, she suggested a yummy Frozen Yogurt/Coffee Shop she likes. It was the perfect casual luncheon location, followed by a trip to the salon for those who chose to do so.

I wanted to keep with her invitation themes and designs, but make it different enough that it wouldn't give away the "ooohhhs" and "ahhhsss associated with opening the magical invitation envelope in a few weeks. So I used the same themes, colors, and changed the fonts. I think it was a success and I was very happy with them.

I sent out a Save The Date for the shower, even though its not widely accepted, or usually unnecessary to do this. I wanted to be sure to nail down the numbers for the salon, and get the appointments for that made, while still having everyone mark their calendars with a date for the luncheon. It was an just a PDF in an email, but included the same designs and themes as the rest of the package. A few weeks later I sent out the invitations; A7 size flat white card, in grey envelopes with white labels and a lace printed seal.

At the shower each lady was presented with a ring tied to a card with instructions for a game. The guests were not allowed to say the brides name or the word "Bride," and if they did someone could steal their BLING. The game was, I felt, classy and not cheesy or annoying as many shower games can be, and it wasnt embarrasing for the bride. At each place setting was a basswood lace cut fan ordered from a wedding favor site, with a place card and menu. Some of the girls arrived early to help me set up, making tissue pom-poms for the table and we lined the center of the table with ribbon an cut flowers.


The luncheon consisted of fresh sandwiches, salad, soup and topped off with frozen custard of course!


I want to thank all the girls for helping set up, and everyone for attending, we had a nice time. Also, Foo's Fabulous Frozen Custard in Kansas City was so easy and fantastic to work with! The salon following was nice and relaxing, though there were a few hiccups in the appointment set-up process and payment process, the services offered by Par Exsalonce in KC were fantastic as well.

Sneak Peak: Prohibition Era Themed Wedding

I have been working on wedding details and invitations with my sister-in-law and her wonderful husband-to-be (we call him pseudo-uncle Brandon, for my daughter, soon-to-be Uncle B!). I posted a while back with images of their Save The Dates, and I am in the process of editing photos of the Bridal Shower I hosted for the bride earlier this month. Everything is cohesive and coming along together nicely. The invitations are assembled and have been mailed to the bride -- awaiting stamps to be sent off to the invitees. The next step are buffet cards, a favor card (or some-sort) and programs. But, until the invitations have been mailed and recieved, I wouldnt want to ruin the surprise! Here is just a taste of the detailing we have put together for this special day.

1.09.2011

Modern Take on the 1800s Royal Wedding

Bloom was given a wonderful opportunity to be a part of an inaugural event here in Austin. Austin Wedding Day’s 1st Diamond Domain Bridal Soiree was this past weekend at the Westin Resort in The Domain. 8 of Austin's top wedding planners were invited to create an 11' x 13' space within their chosen theme. Valerie of Beyond The Big Day invited Bloom to be the stationer for her room at this event. The theme Valerie chose was an 1800's Royal Wedding in reds and golds.


I really think it turned out amazing. The pieces we created for this mock wedding were:

SAVE THE DATE
A Save The Date was created as a flat card adorned with a single gem and paired with a matching envelope addressed with return address and recipient's address.


INVITATION
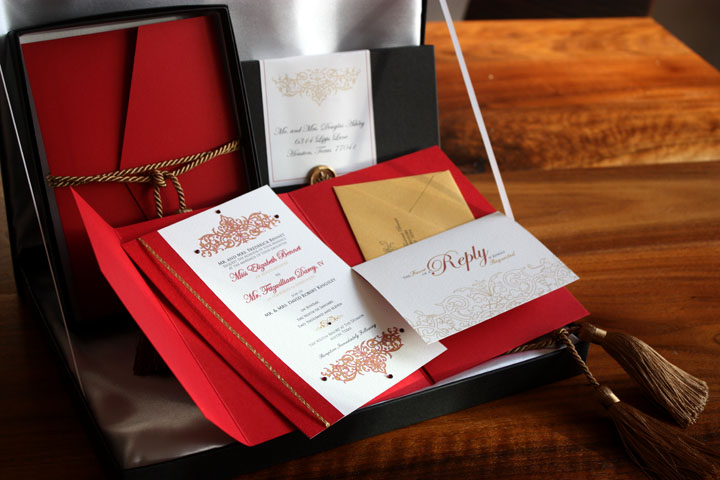
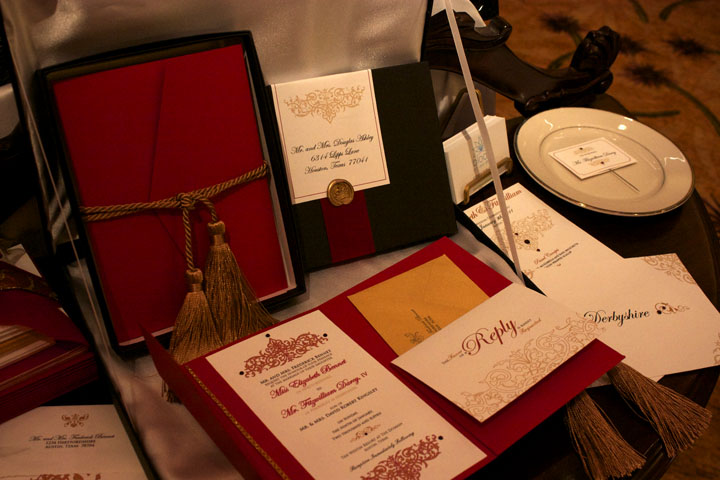
A 5x7 invitation sent in a black invitation box wrapped with a red velvet ribbon, white label and sealed with a crown-wax-seal. Upon opening the box the recipient finds a red envelopment tied closed with a gold cord and tassel. Inside the envelopment is a white textured invitation adorned with an embossed red paper, fine gold-chain-like-ribbon, and ruby red gems. The RSVP is a folded response card hanging over the envelopment pocket and paired with a gold stardream envelope, printed with both return address and address.


ESCORT/DANCE CARDS
The escort cards doubled as a dance card, which was common in the 1800s at any formal affair where dancing was involved. These small folded cards hang from decorative tacks, within an ornate blac
k frame backed with red velvet. Each card is adorned with a gold cord and ruby red gems. The bride and groom each were given a dance card as well. The bride's card is adorned with a long ribbon, matching the invitations, that can hang on her wrist throughout the evening. The groom's card is adorned with a gold tassel and cord to be worn in his coat pocket.


PLACE SETTINGS AND EXTRAS
Each place setting has a menu adorned with ruby red gems and a place card adorned with gems on top of a petit four. Each table has a place card also adorned with gems. Extra signage was designed for the gift card box as well as an instructional sign for the escort card board. Favor tags were created to tie the design into small chocolate boxes.


Here are some images after set up on Saturday and a few quick phone shots from Sunday. I hope to have some more images of the complete event soon.


This stationery package is fit for a king and queen! Thank You to Valerie again for the opportunity!