Showing posts with label Inspiration. Show all posts

11.04.2011

Bloom Favorite: Grey

Grey is everywhere! And I am not complaining. I love grey as a neutral to really highlight and make a bright color pop. I can't look through a blog without seeing a grey inspired wedding somewhere in the mix. Just think about all the colors that Grey goes with. Its a grey-t (haha, I make myself laugh!) compliment to any event's color scheme. Today I found myself fawning over the grey and orange, and grey and yellow combinations while making these inspiration boards on StyleMePretty.


10.10.2011

How well can you Kern?


My Husband sent me this little game online today. I thought it appropriate to share after the letterpress post below. Kerning on the computer is a modern convenience, when typesetting with lead type its much more involved.

Have a go at it.

Kern Me

9.27.2011

WeddingInviteLove Lookbook

We are so excited not only to be a part of the WeddingInviteLove online directory, I've gushed on here before about the greatness of the website, but we are also now included in the first ever WeddingInviteLove Lookbook (Fall 2011). You can view it online or order a copy in all of its physical paper glory! We at Bloom love the feel of real paper, but if you want to see it online here it is.


Thank you to Tracy for all her hard work both with the website and the new Lookbook. We LOVE it!

9.12.2011

Black, white and red all over, programs revisited.

LemonLime photography posted their photos of this wedding on their blog the other day, including a beautiful picture of the programs that Bloom produced. Visit their blog to see the rest.

9.02.2011

Wrap it up!

I've always had a love for wrapping presents. When the holidays roll around, I can't wait to find wrapping paper and make them all coordinate! Making it look cute and matching various wrapping accessories is all consuming for me. We have a friend who's birthday just passed and the party is this weekend. She too I know has a love for making gifts aesthetically pretty and will appreciate this as much as I do! Custom tags available for the holidays, contact Bloom to discuss your holiday gift wrapping ideas.


As a side note, I've never been able to wear green, so why lately am I so obsessed with it?

Brilliant!

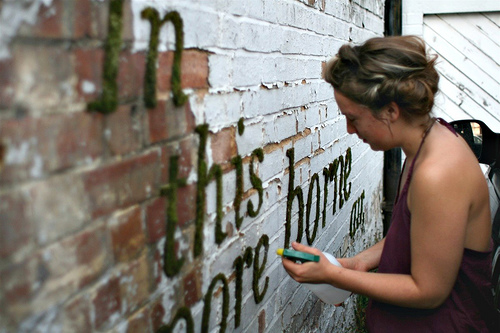
Design Mom finds the most wonderful things, and her current updates on life in France look absolutely lovely! She posted today, here, about this incredible idea. Writing on buildings with Moss?!? Check it out! What a lovely idea for a wedding.

Welcome to September

As September rolls around theres a lull around here, between wedding season and holiday season. Bloom is undergoing a marketing redesign, logo and all, and as I go through this process I've found that I have slacked on my blog reading. Today I took a few minutes to catch up with the trends an beautiful pictures I usually peruse on a daily basis. I thought I'd share with you the wonderful things I've found. Here is some eye-candy for you. Isn't that Watermelon Carving incredible? And I'm in love with the origami place cards. So creative! (click image to enlarge)
1. Netherlands Wedding, Photography by Anouschka Rokebrand Photography (StyleMePretty.com) 2. Austin Wedding by Q Weddings (StyleMePretty.com) 3. Alexandria Wedding by Amelia Johnson Photography (StyleMePretty.com) 4.Kraxberger Estate Inspiration Shoot by Emily G Photography (StyleMePretty.com) 5. Sonoma Wedding by Bliss Event Productions Photos by Carlie Statsky Photography (StyleMePretty.com) 6. A Wedding at Design Within Reach: Renee + Brett, photography by Ventola Photography (GreenWeddingShoes.com) 7. Austin Wedding by Q Weddings (StyleMePretty.com) 8. Sonoma Wedding by Bliss Event Productions Photos by Carlie Statsky Photography (StyleMePretty.com) 9. Kraxberger Estate Inspiration Shoot by Emily G Photography (StyleMePretty.com) 10. Sonoma Wedding by Bliss Event Productions Photos by Carlie Statsky Photography (StyleMePretty.com) 11. Minneapolis Library Inspiration, Photography by Jeff Loves Jessica (StyleMePretty.com) 12. Brooklyn Wedding by Karen Wise Photography (StyleMePretty.com) 13. Sonoma Wedding by Bliss Event Productions Photos by Carlie Statsky Photography (StyleMePretty.com)

1.09.2011

Modern Take on the 1800s Royal Wedding

Bloom was given a wonderful opportunity to be a part of an inaugural event here in Austin. Austin Wedding Day’s 1st Diamond Domain Bridal Soiree was this past weekend at the Westin Resort in The Domain. 8 of Austin's top wedding planners were invited to create an 11' x 13' space within their chosen theme. Valerie of Beyond The Big Day invited Bloom to be the stationer for her room at this event. The theme Valerie chose was an 1800's Royal Wedding in reds and golds.


I really think it turned out amazing. The pieces we created for this mock wedding were:

SAVE THE DATE
A Save The Date was created as a flat card adorned with a single gem and paired with a matching envelope addressed with return address and recipient's address.


INVITATION
A 5x7 invitation sent in a black invitation box wrapped with a red velvet ribbon, white label and sealed with a crown-wax-seal. Upon opening the box the recipient finds a red envelopment tied closed with a gold cord and tassel. Inside the envelopment is a white textured invitation adorned with an embossed red paper, fine gold-chain-like-ribbon, and ruby red gems. The RSVP is a folded response card hanging over the envelopment pocket and paired with a gold stardream envelope, printed with both return address and address.


ESCORT/DANCE CARDS
The escort cards doubled as a dance card, which was common in the 1800s at any formal affair where dancing was involved. These small folded cards hang from decorative tacks, within an ornate blac
k frame backed with red velvet. Each card is adorned with a gold cord and ruby red gems. The bride and groom each were given a dance card as well. The bride's card is adorned with a long ribbon, matching the invitations, that can hang on her wrist throughout the evening. The groom's card is adorned with a gold tassel and cord to be worn in his coat pocket.


PLACE SETTINGS AND EXTRAS
Each place setting has a menu adorned with ruby red gems and a place card adorned with gems on top of a petit four. Each table has a place card also adorned with gems. Extra signage was designed for the gift card box as well as an instructional sign for the escort card board. Favor tags were created to tie the design into small chocolate boxes.


Here are some images after set up on Saturday and a few quick phone shots from Sunday. I hope to have some more images of the complete event soon.


This stationery package is fit for a king and queen! Thank You to Valerie again for the opportunity!

1st Birthday


It's incredible how time flies! My daughter turned one a few weeks ago, and we of course threw her a birthday party. A party of all parties. I had been scoping out ideas for months. We decided on a duck themed
party since that was her first word and she was mildly obsessed with ducks for months. With that theme I began to think of color schemes and after finding an image on another blog using olive green, persimmon, orange and yellow, I decided to use that scheme but change out the olive green for a bright pink. I ran with it!

I created invitations, favor tags, cake topper circles with a special one for hers, a banner, and a first birthday hat. For activities we had decorate your own ducks (found at orientaltrading.com), and a duck matching game floating her little baby pool (also found at orientaltrading.com). For favors I found little window boxes at the container store and filled them with a birthday rubber duck (orientaltrading.com), a bag of snack bunnies in varying flavors, and duck beak noise makers (hobby lobby).

The cake my husband and I made the night before. He had found a rainbow layered cake on tastespotting.com a while back and decided thats what he wanted to do for her party. It was a fun project, especially for an art major. We used 5 colors of professional bakers gel dye (available at craft stores or baking stores) and mixed them indifferent concentrations to get the colors. Of course we only had 6 baking pans so it took 3 batches in the oven, refrigerating the others in the meantime. The next day I iced it with store bought vanilla icing and placed it on a cake board that I wrapped with decorative paper matching the banner and birthday hat, then covered the whole thing in saran wrap.

Take a look, and let me know what you think. All of these pieces are available for your next kids party!